Category Archives: food

Well if you nag enough, you get your own way eventually!

charlotte royale unspoilt

It was my birthday at the weekend – no, no need to send best wishes, especially as the big 4-0 approaches rapidly, and it has already been long forgotten.  My partner – Telsa text me to ask if my hemispherical cake pans were available for loansies.  I thought that I was going to be getting the Star Wars Death Star cake, which I had been dropping hints about for months.

death star

I didn’t get my hopes up though, as by Friday I had had two texts.  One to say that the first attempt had been aborted, and another to say Telsa was off to get some more supplies.  Third time lucky maybe?  I wasn’t quite sure why it was proving so difficult, as I had already informed Telsa that you could by grey coloured ready roll icing at the shop at the end of the road and how hard could two sponge cakes be?

I was instructed not to come in the kitchen on Saturday, as final preparations were being made.  I sneaked a look in the fridge on Saturday, but the creation shrouded in a plastic carrier bag for camouflage purposes didn’t really seem to be big enough for a Death Star.  I presumed it was still to be assembled.

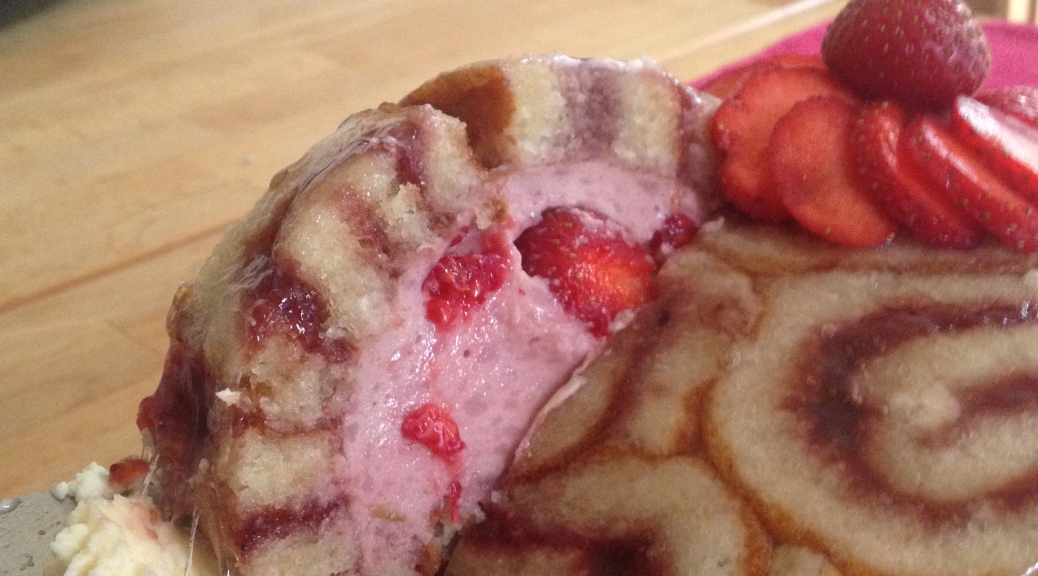
You can imagine my surprise when on Sunday morning I came downstairs to find a Charlotte Royale awaiting me.  Kippertastic (my dog) had been shut out of the kitchen for fear of his tongue accidentally falling against the cream in a horrific cake-based incident.

In my excitement about the Death Star, I had forgotten that I had also been going on about wanting a Charlotte Royale ever since it appeared on Bake Off.  And Saint Mary of Berries would have been proud of this effort.  Made from scratch, it was more perfect than any of the creations produced by the Bake Off contestants.  Tight Swiss rolls, home-made strawberry conserve glaze and a lovely tart mousse at the centre.  Telsa had been struggling a little to get the mousse to set, I believe, and so had put it in the freezer.  It had set round the edges, so it got mixed in a bit.  It gave it a kind of terrazzo style that I actually quite liked.  It didn’t change the texture, but definitely added to the visual appeal of the mousse.

Well done Telsa, you can make that again!

from jam to Jerusalem; preserving to Ottolenghi

I have spent most of the day today researching recipes for an upcoming preserving course that I am leading at Tideswell School of Food.  I have had the ideas mulling round in my head for the last couple of months since my neighbour and I ran the stall at Tideswell Food Festival, but it was only today that I sat down and thought about what I might do.

It’s troubling me greatly to be running this course, as I want to start a similar passion to my own for people, but it is proving difficult to squeeze (every pun intended) as many different techniques as possible into a 3 1/2 hour session in the hope that people will leave inspired enough to start their own research.

In the middle of all this arrived my new microwave, bought by Mum and Dad for my birthday…and thus hatched a plan.  A microwave marmalade demonstration.

And as these things do, another plan hatched in my mind at the same time…a breadmaker jam demonstration!

So now, I have 9 recipes to get through in 3 1/2 hours.  Easy!  Might have to have a little bit of a cull!

Anyway.  The recipe I have created this afternoon, was inspired by my current favourite cookbook, Jerusalem, by Yottam Ottolenghi and Sami Tamimi.  I took his recipes for preserved lemons and pickled lemons, kind of combined them, and added my own twist.

My Nan called in the middle of it all, and I was inspired to do a Blue Peter style demo on the course, so I trotted off to the supermarket to get the ingredients to start off my own preserved limes so that they would be ready for people on the course to try.

Preserved Limes – makes 1 750ml jar

  • 6 limes
  • 40g coarse sea salt
  • 1 tsp smoked paprika
  • 1 tsp chilli flakes
  • few small sprigs rosemary
  • 1 garlic clove, crushed
  • juice of 6 limes (haven’t done this bit yet, so haven’t worked out exactly how much to use)
  • olive oil to cover
  1. Mix the chilli flakes, smoked paprika rosemary and sea salt in a bowl.
  2. Sterilise the jar that the limes are going in to with boiling water.  After you have broken the cheap jar you bought, mopped the floor, dried the inside of all three draws and given everything a good clean, re-sterilise a Kilner jar this time in the sink so that when it breaks it doesn’t need loads of clearing up.  Put the lid in a container and pour on more boiling water.  Leave for 5 minutes.
  3. Cut most of the way through each of the limes in a cross pattern down towards the ‘spider’. Put a spoonful of salt mixture into the cross of each lime, and pack into the jar.
  4. Leave to stagnate for one week.

This is where I have got up to so far, and is the stage shown in the picture that I am hoping to have the technological savvy to be able to add to this.

  1. After 1 week, press the limes down, add the crushed garlic, pour over lime juice until the limes are all covered, and seal with a layer of olive oil.
  2. Leave for at least a further 4 weeks.

This gives me around 5 weeks to work out what I am actually going to do with preserved limes, apart from show them to people on my course!

I will add further pictures as the preserving progresses. I will even try to photograph them a bit more artistically.